After our final critique, I expected to feel a sense of relief, but instead I found myself feeling upset. I think it is fair to say that I will never again take a class like this again. It feels as if this particular learning experience is not over. The entire semester has been about learning, but ideally we would have another one or two semesters to really build on what we've learned. I know that it is not feasible for us to have more than one class like this. John mentioned that for the amount of money we were given for our projects, we would have to have a total of 96 students to break even. I know I have learned a lot in this class, and will implement the skills I have been building for the last couple of months in my future projects, but it will not be the same because of the rich learning environment and the professors as well as peers that I was able to work with.
Tuesday, December 14, 2010
Final Thoughts
This semester has been both frustrating and rewarding. This class was the most time intensive studio that I have taken thus far in my college career, and although it was not worth more credits than my other studios, it quickly became the most important because of all the learning opportunities I felt it presented. At the beginning of the year, I expected to focus on the biomimicry/ bioinspiration for our designs, but to my disappointment I found that this aspect was sometimes fit to our design after, instead of being the factor that shaped our projects. I’ve learned a lot about the design process, and how to be as effective and efficient as possible especially while working within a multidisciplinary team. I was also exposed to a lot of different technology that I would probably otherwise not have heard of, let alone had a chance to experiment with. This added onto my skill set and will definitely affect my future projects. There were frustrations along the way, particularly while designing, because a lot of the time the designs were based on the electronic components, which I did not know a lot about and could not contribute to as much as I would have liked. But these also proved to be learning opportunities for smaller, but important tasks such as wiring and soldering. Overall, I think our smart surface was successful in that we experimented with and implemented a smart material for the biomimicry story we were trying to achieve.
Final Project
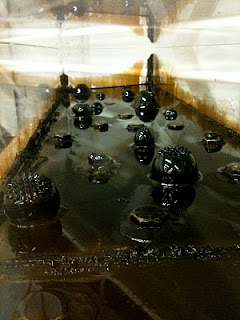
For our final project, we changed the organism we were taking inspiration from. Originally, when we were trying to mimic predator- prey relationships, we were looking at garden eels that retract when they sense a shadow or predator. However, our magnets spike in response to a person. A tetraodontidae, more commonly known as the puffer fish, fit the response of the ferrofluid much better, so that became our bioinspiration.


Sunday, December 12, 2010
Wiring/Coding
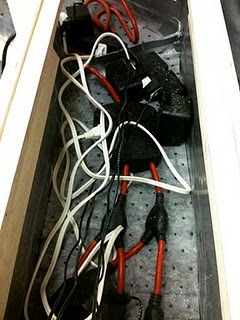
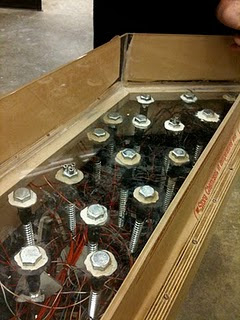
The power lines needed to be placed on the bottom, before the wiring was placed on top of them. Something I forgot to mention about other precautions we took for sealing the box- We put cat litter and oil absorbent pads inside the aluminium trays, and the power lines ( 15 Amp utility extension cords for 16 DC adapters).

Coding that I took from Melany for master/slave arduinos:
#include
int ADDRESS[] = {65,42,43,60,61,62,64,65};
// these are digital pins (leds)
int led[]={2,3,4,5,6,7,8,9,10,11,12,13};
// these are analog pins (photoresistors and pir)
int photo[] = {0,1,2,3,4,5,6,7,8,9,10,11};
int ambient = 15; // this is used for the comparison of each photoresistor
int motion = 14; // pir sensor digital
int motion2 = 13; // second pir sensor
int sound = 12;
int light[12];
void setup() {
Serial.begin(9600);
Wire.begin();
for(int i = 0; i< 12; i++){
pinMode(led[i],OUTPUT);
}
for(int i = 0; i< 12; i++){
pinMode(photo[i],INPUT);
}
pinMode(ambient, INPUT);
pinMode(motion, INPUT);
pinMode(motion2, INPUT);
}
void loop() {
int compare = analogRead(ambient);
int val = analogRead(motion);
int val2 = analogRead(motion2);
int noise = analogRead(sound);
Serial.print(val);
Serial.print(' ');
Serial.print(val2);
Serial.print(' ');
Serial.println(noise);
for(int i = 0; i< 12; i++){
light[i] = analogRead(photo[i]);
}
int i= 0;
while( i < 8){
//Serial.println("val");
int value = ADDRESS[i];
Wire.beginTransmission(value);
//Serial.println(i);
if( val >= val2){
Wire.send(val);
}
else{
Wire.send(val2);
}
Wire.endTransmission();
i++;
}
if (noise >= 10){
int delayTime = 50; //the time (in milliseconds) to pause between LEDs
//make smaller for quicker switching and larger for slower
for(int i = 0; i <= 12; i++){
int offLED = i - 1; //Calculate which LED was turned on last time through
if(i == 0) { //for i = 1 to 7 this is i minus 1 (i.e. if i = 2 we will
offLED = 12; //turn on LED 2 and off LED 1)
} //however if i = 0 we don't want to turn of led -1 (doesn't exist)
//instead we turn off LED 7, (looping around)
digitalWrite(led[i], HIGH); //turn on LED #i
digitalWrite(led[offLED], LOW); //turn off the LED we turned on last time
delay(delayTime);
}
int i = 0;
while (i< 8){
Wire.beginTransmission(ADDRESS[i]);
int number = 111;
Wire.send(number);
Wire.endTransmission();
delay(150);
i++;
}
}
if( val != 0 || val2 != 0){
// for the control of leds----------------------------------
for(int i = 0; i< 12; i++){
if (light[i] > compare + 10){
digitalWrite(led[i], HIGH);
}
else {
digitalWrite(led[i], LOW);
}
}
}
else if (val == 0 && val2 == 0){
for(int i = 0; i<12; i++){
digitalWrite(led[i], LOW);
}
}
}
Saturday, December 11, 2010
Sealing the box
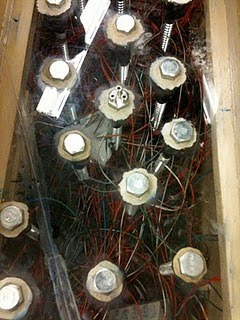
One of our main concerns for this project was the ferrofluid leaking ( something that had happened in our smaller module).Because the electromagnets heat up, they can easily melt the silicone and other adhesives we use to seal the box. I took on the responsibility of sealing it using multiple suggestions from both Keegan and Carlo. To address this issue, we sealed the electromagnets into their holes with epoxy clay on both the top and bottom. Keegan suggested making drip trays out of aluminium and putting them into the wooden box, underneath the electromagnets and wiring, incase the ferrofluid did leak through the epoxy. We also sealed the acrylic box itself with silicone on the inside and outside.


Friday, December 10, 2010
Building the box for the final
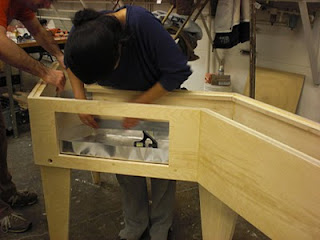
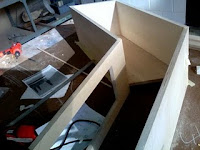
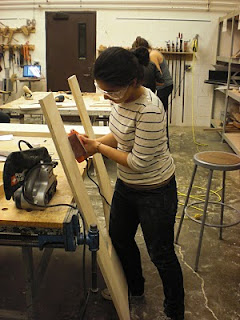
These are some pictures of the process of building the box. Carlo designed the box and Keegan and Josiah helped build it. I was in New York for thanksgiving break during this process, but was mainly responsible for finishing it, which involved sanding and staining the wood with polyurethane.
This design which is mainly driven by our change to a horizontal surface, also invites for interaction because of the form. I personally think it is successful and a significant improvement from our last design.



Saturday, November 27, 2010
Ferrofluid ( and lots of failures)

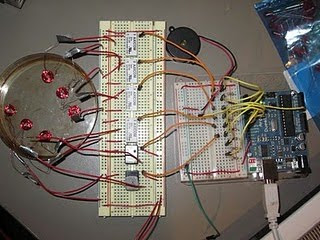
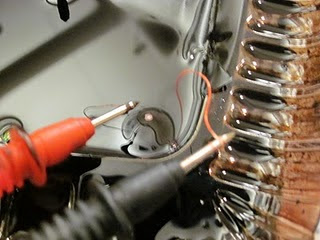 Melany attempted to make an electromagnet that used ferrofluise as the core.They didn't spike the way we wanted them to, but it did make a bump.
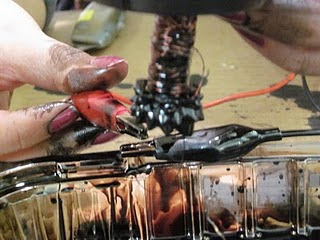 I was able to wrap an electromagnet using enameled copper wire, that spiked the way we wanted. The spikes aren't on as large of a scale as we would like them to be, but this is the first successful electromagnet we have made so far.
Building the first of three boxes for the final
 Rhino model of what we imagine our final to look like. We planned to have three separate boxes that would serve as "aquariums" with electromagnets in each of them that would respond to different stimuli ( sound, vibration, and light).
 Our crit for this idea did not go well. It was suggested that we CNC route the boxes instead of hand cutting them. The boxes are too tall and use a lot of material. We are thinking about going back to our original idea of having a horizontal surface ( a table), instead of the three boxes we were planning on.
 Working Module ( finally)


For this week, we were required to have a working module of our final project to present to various professors and a visiting artist from Berlin. The module is an array of electromagnets and photoresistors , which allowed the electromagnets to turn on in response to changes in light. The electromagnets were constructed out of lag bolts and enameled wire that Keegan took from transformers.
We received positive feedback from most of the professors and visitors. They seemed to like our idea of the predator and prey relationships of garden eels we were trying to mimic ( the garden eels would be the electromagnets, while the people interacting with the module would be the predators).
During our presentation, we mentioned trying out different shaped magnets and seeing how the ferrofluid reacts with then. Max suggested using just the enameled wire in the ferrofluid and seeing what sorts of reactions we get. Right now we are using a lot of energy to power just a small module.
Monday, November 15, 2010
Final Project Movement Mechanisms


After our last critique, it seemed like we were all on board with the general idea of mimicking the shoaling of fish. To move forward with this idea, we had to figure out the movement mechanisms that would allow for us to achieve the effect we were going for.
None of these mechanisms ended up working. So we decided to move forward with Ferrofluid ( something we had tested during this week out of curiosity).
Sunday, November 7, 2010
Idea Generation/ Brainstorming
After an extremely long meeting which consisted of each person discussing their different bioinspirations and how their projects could take form, we came up with a list of about 17 different ideas. The process of narrowing down was done by everyone re-explaining their ideas and then by voting. We rediscussed the ideas that got the majority of the votes, and narrowed it down to two ideas :
1. Carlo's idea of having a wall stacked shapes that would respond to some sort stimuli and make noise when they moved.


2. a collection of surfaces that mimic a shoal of fish

We decided to move forward with the shoal of fish idea, especially because it had more of a biomimetic story behind it
Tuesday, November 2, 2010
Final Project Design Process/ Brainstorming
I was pretty excited to hear that the final project will be open-ended. Our past mini-projects have been more about the mechanics and arduino, and less about the biomimcry ( which is what I was most looking forward to). We usually thought about the design first, and came up with the biomimicry during the process, which was also usually designated by the project constraints.
When doing our " team designing", we had to come up with individual goals. One of mine was that I wanted the biomimcry to be an important aspect of the design and be reflected in the design, not just be some sort of explanation after.
Our first brainstorming session consisted of everyone coming up with different bioinspirations and possible designs that could fit with them.
2 axis biomimetic solar tracker: final iteration

Final Idea. It is a sphere pinned to the lazy susan, the track is on the dome, and runs along a gear. This allows for control of the movement.
The light sensors are on the inside of the sphere. We drilled a pinhole into the top of the sphere to allow the light to come through ( like the eye that was the inspiration. The light is focused onto a single point. The light sensors would be the cones and the wires could be seen as the optic nerves).
After our critique last week, our professors told us to focus more on the mechanics of the solar dome, and focus on getting it to work instead of thinking of a larger setting the trackers could fit into.
Monday, November 1, 2010
Week 4: 2 axis solar tracker ( first iteration)
For our design this week, we have decided to create a glass solar dome/ installation that would act as a lens, and focus light towards solar cells, allowing for the light to be concentrated. The solar panel would be located on a solar tracking device, to take into account the movement of the sun throughout the day. The mechanics behind this would involve placing photoresistors under a pinhole in the solar panel, when the solar panel would be receiving the most energy, the photovoltaics would line up with the resistor, and the movement would stop.
 These are some images Carlo created in Rhino to get an idea of what the domes would look like in an array.
These two images were digitally rendered to get an idea of what the glass domes would look like in a building, and what size/scale they would be in relation to people.
Subscribe to:
Posts (Atom)


