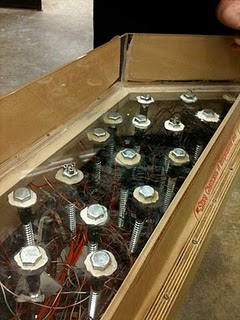
The power lines needed to be placed on the bottom, before the wiring was placed on top of them. Something I forgot to mention about other precautions we took for sealing the box- We put cat litter and oil absorbent pads inside the aluminium trays, and the power lines ( 15 Amp utility extension cords for 16 DC adapters).


Coding that I took from Melany for master/slave arduinos:
#include
int ADDRESS[] = {65,42,43,60,61,62,64,65};
// these are digital pins (leds)
int led[]={2,3,4,5,6,7,8,9,10,11,12,13};
// these are analog pins (photoresistors and pir)
int photo[] = {0,1,2,3,4,5,6,7,8,9,10,11};
int ambient = 15; // this is used for the comparison of each photoresistor
int motion = 14; // pir sensor digital
int motion2 = 13; // second pir sensor
int sound = 12;
int light[12];
void setup() {
Serial.begin(9600);
Wire.begin();
for(int i = 0; i< 12; i++){
pinMode(led[i],OUTPUT);
}
for(int i = 0; i< 12; i++){
pinMode(photo[i],INPUT);
}
pinMode(ambient, INPUT);
pinMode(motion, INPUT);
pinMode(motion2, INPUT);
}
void loop() {
int compare = analogRead(ambient);
int val = analogRead(motion);
int val2 = analogRead(motion2);
int noise = analogRead(sound);
Serial.print(val);
Serial.print(' ');
Serial.print(val2);
Serial.print(' ');
Serial.println(noise);
for(int i = 0; i< 12; i++){
light[i] = analogRead(photo[i]);
}
int i= 0;
while( i < 8){
//Serial.println("val");
int value = ADDRESS[i];
Wire.beginTransmission(value);
//Serial.println(i);
if( val >= val2){
Wire.send(val);
}
else{
Wire.send(val2);
}
Wire.endTransmission();
i++;
}
if (noise >= 10){
int delayTime = 50; //the time (in milliseconds) to pause between LEDs
//make smaller for quicker switching and larger for slower
for(int i = 0; i <= 12; i++){
int offLED = i - 1; //Calculate which LED was turned on last time through
if(i == 0) { //for i = 1 to 7 this is i minus 1 (i.e. if i = 2 we will
offLED = 12; //turn on LED 2 and off LED 1)
} //however if i = 0 we don't want to turn of led -1 (doesn't exist)
//instead we turn off LED 7, (looping around)
digitalWrite(led[i], HIGH); //turn on LED #i
digitalWrite(led[offLED], LOW); //turn off the LED we turned on last time
delay(delayTime);
}
int i = 0;
while (i< 8){
Wire.beginTransmission(ADDRESS[i]);
int number = 111;
Wire.send(number);
Wire.endTransmission();
delay(150);
i++;
}
}
if( val != 0 || val2 != 0){
// for the control of leds----------------------------------
for(int i = 0; i< 12; i++){
if (light[i] > compare + 10){
digitalWrite(led[i], HIGH);
}
else {
digitalWrite(led[i], LOW);
}
}
}
else if (val == 0 && val2 == 0){
for(int i = 0; i<12; i++){
digitalWrite(led[i], LOW);
}
}
}
int ADDRESS[] = {65,42,43,60,61,62,64,65};
// these are digital pins (leds)
int led[]={2,3,4,5,6,7,8,9,10,11,12,13};
// these are analog pins (photoresistors and pir)
int photo[] = {0,1,2,3,4,5,6,7,8,9,10,11};
int ambient = 15; // this is used for the comparison of each photoresistor
int motion = 14; // pir sensor digital
int motion2 = 13; // second pir sensor
int sound = 12;
int light[12];
void setup() {
Serial.begin(9600);
Wire.begin();
for(int i = 0; i< 12; i++){
pinMode(led[i],OUTPUT);
}
for(int i = 0; i< 12; i++){
pinMode(photo[i],INPUT);
}
pinMode(ambient, INPUT);
pinMode(motion, INPUT);
pinMode(motion2, INPUT);
}
void loop() {
int compare = analogRead(ambient);
int val = analogRead(motion);
int val2 = analogRead(motion2);
int noise = analogRead(sound);
Serial.print(val);
Serial.print(' ');
Serial.print(val2);
Serial.print(' ');
Serial.println(noise);
for(int i = 0; i< 12; i++){
light[i] = analogRead(photo[i]);
}
int i= 0;
while( i < 8){
//Serial.println("val");
int value = ADDRESS[i];
Wire.beginTransmission(value);
//Serial.println(i);
if( val >= val2){
Wire.send(val);
}
else{
Wire.send(val2);
}
Wire.endTransmission();
i++;
}
if (noise >= 10){
int delayTime = 50; //the time (in milliseconds) to pause between LEDs
//make smaller for quicker switching and larger for slower
for(int i = 0; i <= 12; i++){
int offLED = i - 1; //Calculate which LED was turned on last time through
if(i == 0) { //for i = 1 to 7 this is i minus 1 (i.e. if i = 2 we will
offLED = 12; //turn on LED 2 and off LED 1)
} //however if i = 0 we don't want to turn of led -1 (doesn't exist)
//instead we turn off LED 7, (looping around)
digitalWrite(led[i], HIGH); //turn on LED #i
digitalWrite(led[offLED], LOW); //turn off the LED we turned on last time
delay(delayTime);
}
int i = 0;
while (i< 8){
Wire.beginTransmission(ADDRESS[i]);
int number = 111;
Wire.send(number);
Wire.endTransmission();
delay(150);
i++;
}
}
if( val != 0 || val2 != 0){
// for the control of leds----------------------------------
for(int i = 0; i< 12; i++){
if (light[i] > compare + 10){
digitalWrite(led[i], HIGH);
}
else {
digitalWrite(led[i], LOW);
}
}
}
else if (val == 0 && val2 == 0){
for(int i = 0; i<12; i++){
digitalWrite(led[i], LOW);
}
}
}